Not All Buttermilk Is Equal
Traditional Old-Fashioned Buttermilk and Cultured Buttermilk are not the same things. Traditional Old-Fashioned buttermilk is the thin white liquid you have left when you make butter from cream. We’ll talk more about Old-Fashioned Buttermilk in another post.
Cultured buttermilk (what you find at the grocery store) is somewhat similar to yogurt. Live cultures (usually from the Lactococcus Lactis family) are added back into pasteurized low-fat or nonfat milk and then allowed to ferment, so the milk sugars turn into lactic acid.
Personally, I love the stuff and can’t get enough, and while you may or may not like to drink buttermilk, whether you realize it or not, it’s the secret ingredient for many of the foods we eat. So if you’re going to cook from scratch, you’re going to want a supply of fresh cultured buttermilk.
Who Buys Buttermilk Nowadays
Simply put, you do.
At least if you have ever bought a pre-made cake, biscuits, bread, paid for a nice dinner at a restaurant, or purchased any number of boxed mixes for pancakes, waffles, etc. That list goes on, so yep, pretty much everybody buys buttermilk but may not realize it.
What people don’t buy much of nowadays are cartons or jugs of cultured buttermilk. The reason, quite simply, is we don’t cook many things from scratch anymore. Everything is pre-made, or there is a box of mix all made up and ready to go.
Convenience Can Be Expensive
The truth is, you can save a lot of money when you cook from scratch, but let’s face it, most of us either don’t have the time or at least don’t think we have the time to do that. So, the trick is to find ways to save both time, money, and just the right balance between what you do have time to cook from scratch, what you can cook partially from scratch, and what you cannot find the time to do.
The answer is not always the most obvious because making a roast takes time, but a slow cooker will cook while you’re away. Again most people don’t think about it for anything but reheating leftovers but learn to work with one, and a microwave oven will help you prepare delicious meals, from scratch, in roughly a fourth of the time.
Over the past few hundred years, in the name of convenience, food manufacturing has become one of the biggest money-making games in the world. Of course, we can trace the art and science of processing food for storage back thousands of years.
The process of bottling food and pasteurization became popular in the 1800s and meant pre-packaged food was safer to handle, easier to store, and more available to everyone.
With the creation of the tin can, transporting food in glass bottles was replaced pretty quickly. Canned food then became a vital source of supply
The Battle Over Sliced Bread
While safe canned food was convenient, the idea of making a fortune by creating and selling convenience foods didn’t take hold until the US Government banned the sale of pre-sliced bread.
Yep, you read it correctly. During WWII, the government attempted to save on wax paper, or more specifically, paraffin wax, by banning the sale of pre-sliced bread.
The public outcry was so loud that the ban didn’t last long. Not only did Washington hear the cry for convenience, but every manufacturer across the world. After the war ended, the baby boom began, the convenience food industry was born and quickly positioned itself to change the world.
Is Convenience Affordable
It’s a simple fact that some convenience foods are considerably less expensive than natural ingredients. In the same breath, others are far more expensive. Determining which is which, now there’s the trick.
A couple less expensive examples that come to mind, powdered milk can frequently cost considerably less than its liquid version. Frozen fruits and vegetables “can be a better deal” than fresh. On the other hand, watch for the in-season specials of fresh produce. Deals on in-season produce can be unbelievably less expensive than frozen.
On the more expensive side of things, frozen waffles, pancakes, ready-made cakes, pie, and many types of bread. Of course, most certainly, cultured buttermilk is high on the list as well. Many of these items are two to four times more expensive than their homemade version.
The Dirty Little Money-Saving Secret
Honestly, I believe cultured buttermilk is priced so high, partially to make convenience mixes that use powdered buttermilk look less expensive. I can’t find any other reasonable explanation for it. The truth is, making cultured buttermilk is one of the easiest things you could ever do in a kitchen. You don’t need any special equipment, no special skills. Two ingredients and time are all you need to make fresh cultured buttermilk at home for pennies on the dollar.
So Why Exactly Do I Need Homemade Buttermilk Anyway
Just for openers, when compared to the price of buttermilk off the supermarket shelf, homemade is dirt cheap, and as long as you make it regularly, you will never run out of buttermilk again.
When you use buttermilk in your quick bread recipes, pancakes, waffles, etc., the reaction between the acid in the buttermilk and the baking powder, baking soda, or yeast creates a bubbly fizz that will result in a light, fluffy texture that’s beyond compare. The baking soda or powder will also reduce the overall bitterness of the cultured buttermilk, leaving just the right amount of tartness to the biscuits, pancakes, and more.
In a pinch, there are several substitutes you can quickly make in small batches that will work in your recipes. You can make sour milk by adding a tablespoon of lemon juice or vinegar to a cup of milk and letting it curdle for about ten minutes. You can also take plain yogurt and thin it a bit with milk for basically the same effect.
Make Real Cultured Buttermilk
Real cultured buttermilk can be just as easy if not easier to make and keep on hand and have when you need it as making soured milk would ever be in a pinch. All you need are two ingredients to make at least a quart plus about 30 seconds of your time to feed the culture at least once a week. As long as you can do that, you will never run out of fresh cultured buttermilk. According to the St. Louis Dairy Council, cultured buttermilk will keep in your refrigerator for about two weeks.
The best choice for making buttermilk the first time is to purchase an heirloom culture that will reculture from one batch to the next.
Your second choice could be to pick up a carton of cultured buttermilk from the store to use as a starter.
I know the second choice actually sounds like the easier choice, but how well your buttermilk will reculture time after time will depend upon the quality of the carton of cultured buttermilk that you bought to make your first batch.
After making your first batch, you’ll need to feed the cultures at least weekly to keep the cultures active. The longer you go beyond seven days and don’t feed your culture, the less likely it will be that your new batch of buttermilk will turn out the way you want it.
To feed your buttermilk cultures, you’ll need to add 1/4 cup cultured buttermilk from your previous batch to a quart of any skim, 1%, 2%, or whole milk for each quart you plan to make. You’ll also need a quart or half-gallon jar with a tight-fitting lid. Then let it sit loosely covered at room temperature on the back of the counter for 12 to 24 hours, preferably out of direct sunlight. The perfect temperature range to do this job is about 70 to 80 degrees.
I know some recipes will tell you that you have to use fresh, raw milk to make your buttermilk. That is just not the case. Other recipes will tell you you need to raise the temperature of the milk to 180 degrees before making the buttermilk. That would be what you need to do to pasteurize raw milk, so unless you are using raw milk, that step is unnecessary. The milk you purchase from the store already went through the pasteurization process. Finally, I’ve noticed several recipes that tell you to stay away from ultra-pasteurized milk. All I can say is good luck, and mine turns out just fine.
Is It Safe To Leave Milk Out
As for safety, you will have to be the judge of that for yourself. I am in no way recommending you do anything you feel to be unsafe. What I am telling you, I’ve been doing this my whole life and never once had a problem.
In America, we’re all taught to fear any food item that has remained at room temperature for more than 8.7 seconds. Well, maybe not quite that bad, but I hope you see my point because the truth is people have been safely fermenting and culturing food around the world for thousands of years.
To make cultured buttermilk, you must add bacteria and allow milk to ferment and culture. If you don’t, you cannot make cultured buttermilk, period. It’s just that simple. Whether some company cultures and ferments ten-thousand gallons at a time or you, in your home, culture and ferment a few quarts is irrelevant. What matters is that you do it in a manner that is as safe as possible.
When you pasteurize raw milk, you’re killing bacteria in the milk. The pasteurization process is not selective, so you’re killing both beneficial and non-beneficial bacteria. When you re-introduce beneficial bacteria found in cultured buttermilk and allow the milk to ferment and culture at room temperature, the bacteria feed on the natural sugars found in the milk. Sugar turns into lactic acid, which in turn helps to protect the cultured milk from other bacteria.
What Are Some Things I Can Make With Homemade Buttermilk
You’ll want to bookmark this page and check back here from time to time because the list is pretty much endless. Each time we add a recipe that uses cultured buttermilk, we’ll update this article with a link to the recipe.
Here are just a few to get you started:
Buttermilk Pancakes
Waffles
Buttermilk Biscuits
Muffins
Buttermilk Cornbread
Marinades
Ranch Dressing
Tenderizing Meat
Créme Fraiche (French Style Sour Cream)
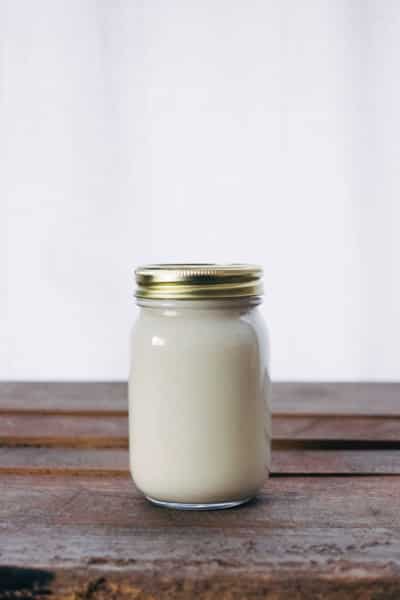
Easy Fresh Homemade Cultured Buttermilk
Stop paying extra for buttermilk. Once you've bought it you can make your own again, and again, and again.

Homemade Buttermilk
Instructions
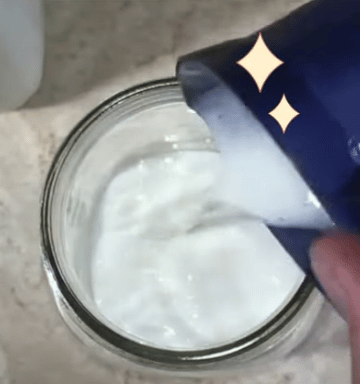
Mix
Using a very clean mason jar or another suitable container, add cultured buttermilk to the jar and then pour the milk into the buttermilk and mix well. Close the lid and mix well
Culture
Place the covered container on your counter out of direct sunlight in a warm spot. 70° to 80° is perfect. Allow to culture, undisturbed for 12 to 24 hours. Alternatively, you can place the container in your oven with only the light turned on. I've done this in the winter many times. A box style dehydrator or proofing box is also a perfect choice.

Refrigerate
Refrigerate at least a few hours and then use just throughout the week, just as you would regular cultured buttermilk you purchase at the store.


Nutrition Facts
Servings 4
- Amount Per Serving
- Calories 102kcal
- % Daily Value *
- Total Fat 3g5%
- Saturated Fat 2g10%
- Sodium 113mg5%
- Potassium 352mg11%
- Total Carbohydrate 12g4%
- Sugars 12g
- Protein 8g16%
- Vitamin A 458 IU
- Calcium 294 mg
- Iron 1 mg
* Percent Daily Values are based on a 2,000 calorie diet. Your daily value may be higher or lower depending on your calorie needs.
Note
Homemade buttermilk is cultured low-fat milk.
Homemade cultured buttermilk is a wonderful and inexpensive replacement for store-bought and can be used anywhere buttermilk is called for.
To keep the beneficial bacteria in your buttermilk fresh and active, refresh your cultured buttermilk at least once a week.
You now have a practically endless supply of buttermilk for pancakes, biscuits, loaves of bread, and more.